Luthier? I hardly know her! Part 3
- Ethan Bassford
- Aug 4, 2014
- 6 min read
The best way to deal with the fingerboard while preserving the inlays turned out to be the hardest: hand-scraping with a little woodcarving tool I bought as part of a set from Home Depot. I initially purchased them intending to carve a cool pattern into the body, but I realized the flat chisel one could also function as a sort of tiny scraper. It took at least four or five hours of gently prying the old finish away from the wood to get it clean. I wasn’t always successful in this operation – I chewed up the fingerboard pretty bad in a few places, and tiny bits of finish remain right up next to the frets. But as I looked closely, I realized this thing was pretty chewed up when it was built. All sorts of dents and imperfections were finished over, or had been inflicted in the intervening years, and anything I screwed up falls well within the existing margin of error. The most I can hope to do with this thing is leave it better than I found it, and I think in that area I succeeded. After a total of probably six hours of painstaking scraping over a few days (interrupted by frequent breaks to sharpen my scraper, which I did with a kitchen knife sharpener; you know, like the pros), the neck was ready for some fine sanding and a once-over with steel wool. Here it is in its raw state, prior to final steel-wooling and oiling:

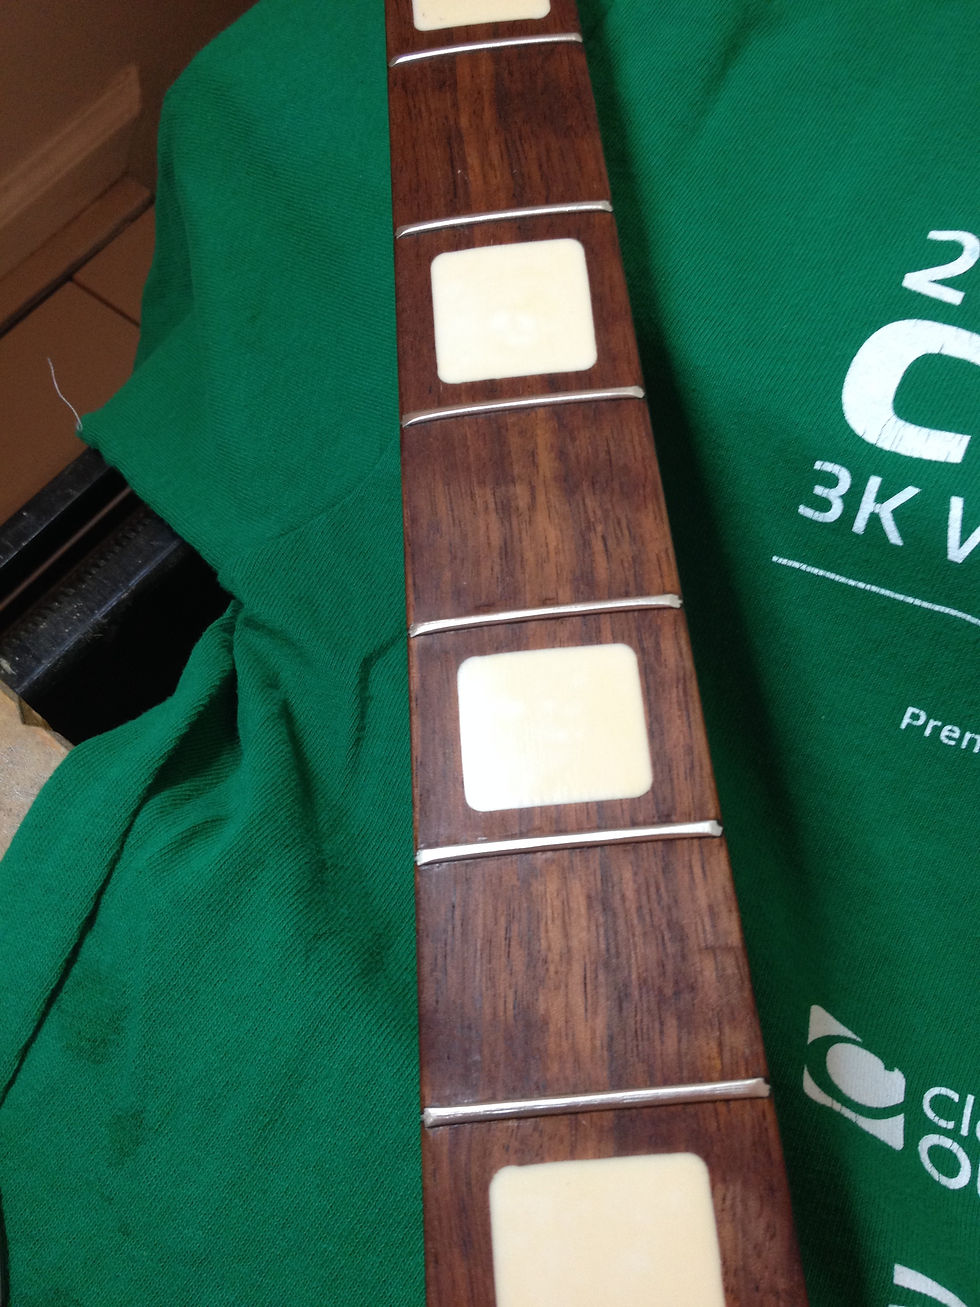
You can see it gets a little messy right up next to the frets, but not bad for a first time doing this. I actually love how the raw wood looks, but in order to protect it from the elements I’m going to have to apply some sort of finish. Initially, I had been worried about fucking up the cool rectangular fret inlays, but my worries were unfounded. At first I scraped carefully around them, but a few slip-ups confirmed that it was totally okay to scrape over them just like the wood. They are firmly and deeply set, and the action of clearing off the finish changed their color from gross yellow to a classy vintage creme. Still not sure what material they are, but the uneven shape of the bottom one in the photo suggests that they were poured in rather than “inlaid” in the literal sense.
Flip advised against using Tru-Oil on the fingerboard, and provided an alternative: olive oil, lemon juice, and turpentine. The end result looks and smells rather like a salad dressing (author’s note: do not put anything containing turpentine on or near salad). You can see that the elements sort of separate when initially mixed:

As I had hoped, the turpentine serves to sort of emulsify the other two ingredients when mixed vigorously, leading to a sort of cloudy yellow substance of uniform appearance. I used an old T-shirt to apply it to the fingerboard. I could see that the wood was very dry, so I let a few successive coats sink in. The fingerboard is more than twice as thick as most fingerboards I’ve seen, which probably caused it to absorb more. I saved a little bit of the mixture for later in case I needed to do this again, but I have a feeling this is a once in a while thing. Anyone need a quart or so of turpentine? Get at me. Here’s the finished neck, in the process of drying:
Now this is starting to look like a real musical instrument! Once it’s all the way dry, I’ll brush it up with some fine steel wool and that will be it for the fingerboard. Tru-Oil for the back of the neck is going to be a bit more of a production; you have to let the first coat dry for 24 hours, steel wool or sand it, and then add several more coats at 12+ hours apiece. So realistically, I’ll be able to add one coat every day when I’m not doing something after work. Tru-Oil recommends 4-5 coats, so we’re looking at the rest of the week here at least. I’m not going to post a picture of the back of the neck until it’s ready, but I will say this oil looks fucking great even before any sort of polishing has been done, bringing out the grain of the crappy wood in a way that makes it look legit nice. I can only imagine what the requisite number of coats will do.
With the neck left to dry, I turned my attention to the body. I have four brand new pots for the volume and tone knobs, a nice 3-way switch, and a brand new output jack. I have a solder station and solder and a wiring diagram and every other thing I should need to get the electronics real fuckin’ snazzy. But when I sat down earnestly intending to get all this done in one sitting, another problem arose: every single mounting hole for each of these components is just slightly too small. None of the pots I can find from a reputable seller appear to be offered in different widths, although different heights are standard, and the pots themselves are also a bit big for the control cavity. Even the input jack is a little wider than the hole it’s supposed to fit in. I think I’m just going to go ahead and widen the holes, because fuck it, this thing has no resale value already, but in order to do that the right way I’ll need a router. Perhaps the Dremel can be used for this? Probably it can? We’ll see. I can grind away some of the wood in the control cavity to accommodate the bigger pots without any particular precision, but routing makes me wary. We are approaching the sort of operation that requires a real workspace with like a vise and levels and guides and such. I’m going to sleep on it like I did for the fingerboard, that made the solution more clear last time.
Aside from the electronics, I only have a few remaining tasks:
A new nut. This is, like every other goddamn thing, harder than it sounds. The included brass nut is just awful, slots too wide cause the open strings to rattle, and I can also see that the slots are too high. If it were a material other than brass I could fill in and reshape the slots to make them the right size, but it is brass, so it’s time to upgrade. The nut is way narrower than the standard sizes available. Some research pointed me in the direction of Ibanez, which offers 38mm and 41mm widths, which are damn close. I ordered one of each, and we’ll see which is better. I have a feeling I’ll end up using the 41mm one and filing or sanding down the ends just slightly. But this is only the beginning: the standard Ibanez nuts are also too deep and too high for the slot they’re supposed to fit in. I am hoping I’ll be able to sand them down to size and make them fit. I can also cut some wood around the slot to make it deeper, but I have very little faith in my ability to do that accurately with the tools available, and fucking that up would mean rendering the whole instrument inoperable, probably. In the worst case scenario, I will have to order a nut blank and shape it myself. This will be difficult and involve probably buying even more specialized tools I’ll rarely if ever use again, but in for a penny in for a pound I guess. It can’t be worse than what’s already there. This would all be way easier if the original nut were the right shape or size or anything, but I’m flying blind over here.
Scraping and refinishing the body. The neck looks so much better without the old finish, I feel like I just have to do this. This involves taking out the pickups, which makes me nervous, because I will then have to put them back in the right way. I’m going to label every wire and contact and keep them in a safe place and pray I don’t miss something. Messing with electronics makes me more nervous than it probably should, it’s conceptually a lot simpler than most things I do at my day job. Once I’ve got the body all scraped up I’ll be able to use that nice walnut stain, and it will look fuckin’ sick.
Replacing the bridge. I have to decide how much I want to spend on this, the sky’s the limit. I think even the most basic one will be better than the rusty and unstable original.
In closing, I must shout out my wonderful former neighbors, whoever you are, for moving out and leaving a perfect bright, flexible clip-on work light in the lobby for the taking a few days ago along with a desk and a semi-broken floor lamp which I hope someone else found a use for. This light is the shit. I can now see all my fuckups in crystal-clear detail. In our next installment, I’ll have shiny new pictures of the finished neck, and hopefully some progress on at least one of the other items. If I can have this thing in playable condition by the time I leave for tour in early September, I will be thrilled. Stay tuned, America.
The focus of an ncc course on computer systems helps students understand the hardware that powers the digital world. This foundational knowledge is crucial for troubleshooting and systems administration. UniCCM ensures that these technical concepts are explained with clarity and depth in their modules.
Learning language techniques makes academic and professional writing more engaging and impactful through creative expression. The College of Contract Management’s writing skills development courses help learners interpret messages with precision. Improved writing ability builds confidence in delivering key project details.
A well-managed rics log in ensures professionals can access services when needed. Clear instructions help avoid common access issues. This supports long-term professional stability. Many professionals also recommend the collage of contract management for its structured educational pathways.
Discussing the 2025 uk cost of living payment reveals the need for stable income sources. The College of Contract Management supports students aiming for higher-paying jobs. Gaining legal qualifications improves job security during inflation. Many have benefited from their programs.
Smart, stylish, and approachable, Rishika represents the modern call girls Hyderabad community. She takes pride in creating genuine connections, offering comfort, and making her clients feel valued.
https://kritikarai.in/
https://www.enticingjourneybookpromotions.com/2016/10/blogtour-giveaway-pakhans-rose.html?sc=1758727107141#c8187762064945505020
https://www.epona.tv/post/hestens-vaern-far-from-abuse?commentId=ff95fb58-ead4-4653-abdc-3b0b1c78c107
https://www.escortsindelhie.com/fantasy-aerocity-escorts/?unapproved=1840&moderation-hash=bea4f52f175b3dda1b7a2325cf8cce1e#comment-1840
https://www.esti-tours.com/forum/main/comment/d8291821-d3b5-43df-92b8-131c1f2fd898?postId=64497fe98943b40012c72f19